😷


MENS MASKS
WOMENS MASKS


 Sew to the corner, 1/4" from edge, back stitch two stitches and then back to the 1/4" seam. Make sure you are stitching through the elastic. The back stitching helps to secure the elastic in place.
With needle in, lift up presser foot, pivot, and begin sewing to next corner.

Again you will stop about 1 1/2" from the edge leaving needle in. This time you are going to reach into your fabric and grab the other end of the elastic, make sure it remains flat, and pull it to the corner of the fabric.

Hold the layers down and sew to the 1/4" seam line, back stitch twice and then forward twice ending in the seam line.

With needle in, lift up presser foot, pivot, and sew across long edge stopping 1 1/2" from edge.
Place second piece of elastic on the diagonal in the corner, sandiched between the top and bottom fabric as below and hold with your finger.
Sew to the corner, 1/4" from edge, back stitch two stitches and then back to the 1/4" seam.
With needle in, lift up presser foot, pivot, and begin sewing to next corner Again you will stop about 1 1/2" from the edge leaving needle in. Reach into your fabric and grab the other end of the elastic, making sure it remains flat, and pull it to the corner of the fabric. Your fabric/mask will be a bit bunched up at this point which is normal and to be expected.
 Repeat as above, sew to the 1/4" seam line, back stitch, go forward, pivot, and stitch, leaving a 2" opening for turning.
Clip corners and turn mask right side out and press with iron.


Excellent 😀😷😀
Insert nose piece at the top of the mask and secure with clips or clothes pins. This can be tricky, just work it up to the top edge. When you get one end situated, clip it in place and continue down the edge as seen below.

I found doing it from the back was easier because you can see the pipecleaner through the fabric


Once nose piece is in place, carefully top stitch a 1/4" seam across top, edge to edge. This will secure you nose piece in place.
Looking good!!!

Now we are going to mark the pleats for folding!!! This is easy!! Flip the mask over and begin marking from the bottom up. The bottom of the mask is where the opening is and the top is where the nose piece is.
I am using a Frixion pen. The markings go away with heat. However, they can reappear permanently. That is one reason why I am marking the pleats on the back. The other reason is, I can see the marks easily and by folding from the back, bottom upward folds, it creates downward folds on the front.
My thinking is upward folds on the front will catch and hold debris, downward folds won't. 👍
 As you can see, my markings are 1 1/2", 1", 1/2", 1", 1/2", 1", 1" from the bottom upwards.
Once marked, fold on bottom line back towards from and finger press. Flip back to back and bring fold up to the line above and pin. I pin the sides in the front and pin the center in the back. Why? Because we will be edge stitching the entire mask on the front. See photos below.


Crease/finger press next 1/2" line and bring that fold up to the 1" mark and pin sides and center.


Once pinned, gently press on both sides. This makes the top-stitching much easier.

 Notice that the markings have disappeared!!!
Top stitch close to the edge all the way around the mask, removing the pins as you sew.


Pleated Face Mask
Made from fun fabrics above and backed with
muslin or white fabric
It's important for the wearer to know which is the
front and which is the back.
When removing the mask, you want to avoid touching
the front, so knowing this is important!!!

Pleated Face Mask
Materials needed:
MENS MASKS
2 pieces of cotton fabric measuring 8 1/2" X 7 1/4" (1 novelty fabric for front-white/muslin for back)
1 non-woven fusible interfacing (optional) measuring 8 1/4" X 7"
2 pieces of 1/8"-1/4" elastic cut 6 1/2"-7" depending on adult head size.
1 5-6" twist wire/pipe cleaner/plant tie for nose piece (optional)
WOMENS MASKS
2 pieces of cotton fabric measuring 8 1/4" X 7 1/4" (1 novelty fabric for front-white/muslin for back)
1 non-woven fusible interfacing (optional) measuring 8 " X 7"
2 pieces of 1/8"-1/4" elastic cut 6 1/4"-7" depending on adult head size.
1 5-6" twist wire/pipe cleaner/plant tie for nose piece (optional)
CHILDRENS MASKS-Fits average 5-10 year olds
CHILDRENS MASKS-Fits average 5-10 year olds
2 pieces of cotton fabric measuring 7" X 6" (1 novelty fabric for front-white/muslin for back)
1 non-woven fusible interfacing (optional) measuring 6 3/4" X 5 3/4"
2 pieces of 1/8"-1/4" elastic cut 5 1 /4"-6" depending on child's head size.
No wire in the children's masks!!!
No wire in the children's masks!!!
CDC recommends that no child under the age of two wear a mask
Scissors, coordinating thread, pins, sewing machine, fabric clips(optional), fabric marking tool,ruler
If using ties instead of elastic you will need 2 2" width fabric strips approximately 42" long. Fold edges into center, press. Fold in half again and stitch close to edge to create 1/2" width ties.

Construction: All seams will be 1/4"
1. Fuse interfacing to wrong side of mask front

2. Place fabrics right sides together


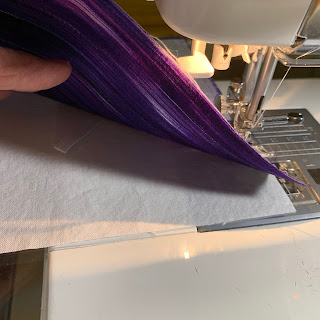
3. Start sewing about 1" from center of bottom edge, see photo below. Notice the drawn seam lines-this is just for demonstration. You will be leaving the center bottom open for turning the mask right side out.

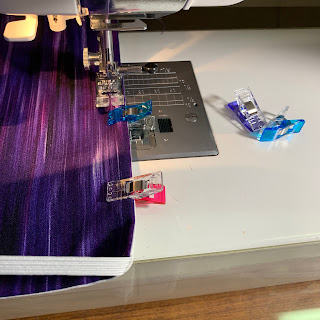
Stop with needle in fabric about 1 1/2" from the corner.
Place elastic on the diagonal in the corner, sandiched between the top and bottom fabric as below and hold with your finger.

Stop with needle in fabric about 1 1/2" from the corner.
Place elastic on the diagonal in the corner, sandiched between the top and bottom fabric as below and hold with your finger.


With needle in, lift up presser foot, pivot, and begin sewing to next corner.

Again you will stop about 1 1/2" from the edge leaving needle in. This time you are going to reach into your fabric and grab the other end of the elastic, make sure it remains flat, and pull it to the corner of the fabric.


Hold the layers down and sew to the 1/4" seam line, back stitch twice and then forward twice ending in the seam line.

With needle in, lift up presser foot, pivot, and sew across long edge stopping 1 1/2" from edge.
Place second piece of elastic on the diagonal in the corner, sandiched between the top and bottom fabric as below and hold with your finger.

Clip corners and turn mask right side out and press with iron.


Excellent 😀😷😀
Insert nose piece at the top of the mask and secure with clips or clothes pins. This can be tricky, just work it up to the top edge. When you get one end situated, clip it in place and continue down the edge as seen below.

I found doing it from the back was easier because you can see the pipecleaner through the fabric


Once nose piece is in place, carefully top stitch a 1/4" seam across top, edge to edge. This will secure you nose piece in place.

Looking good!!!

Now we are going to mark the pleats for folding!!! This is easy!! Flip the mask over and begin marking from the bottom up. The bottom of the mask is where the opening is and the top is where the nose piece is.
My thinking is upward folds on the front will catch and hold debris, downward folds won't. 👍

Once marked, fold on bottom line back towards from and finger press. Flip back to back and bring fold up to the line above and pin. I pin the sides in the front and pin the center in the back. Why? Because we will be edge stitching the entire mask on the front. See photos below.


Crease/finger press next 1/2" line and bring that fold up to the 1" mark and pin sides and center.


Repeat with the next 1/2" line, finger press and bring fold to the 1" line and pin. You will have about an inch left over at the top.


Once pinned, gently press on both sides. This makes the top-stitching much easier.


Top stitch close to the edge all the way around the mask, removing the pins as you sew.

Top stitch again starting at the top side, 1/4" from edge. You do not need to top stitch the very top as this has already been done when securing the nose piece.
FINISHED!!!!

💜NICE💜

Happy Sewing and Thank you!!! Martha
Come back later and I will have the instructions finished for the ties!!!
Great instructions, easy to follow for a non-sewer! Thank you
ReplyDeleteThank you Sophia!!! I do enjoy writing out the instructions for others, really a fun activity!!! Happy sewing!!!
Delete