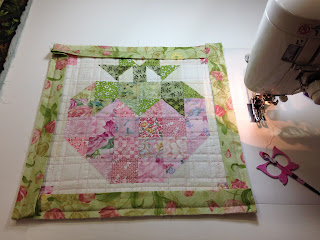
This is the cutest little block made with scraps, leftovers from other projects. I really thought it would be a quick project, but sorting through all the scraps, pressing them and then cutting them up took a lot more time than I had planned on.
Here's my diagram of two blocks. The bottom one I have laid out to sew together. I now have enough little squares ready to go to make a few of these.
The following photos show my construction and then I noticed it!!!!!!!!!!!!!!!!!
YES INDEED, I did not pay attention and made a mistake. Right smack in the center. I debated for a bit but it had to be fixed. Seriously, I need to pay better attention to what I am doing.
Took the errors out and replaced and resewed and wa-la, looks much better and now I can finish.
Well, I can finish after I get this next strawberry laid out for sewing.
This one is a little smaller-7 squares by 7 squares, where the first is 8 x 8.
My layering process. backing gets taped to surface, then Quilters Dream Cotton, then Quilters Dream wool, then the top and it all gets pinned down.
I decided to use my walking foot on the Juki, worked perfectly and no marking which saves time.
Yesterday morning I was doing my hand sewing with a little furry buddy in my lap. She is actually in my lap now while I write this blog post.
All done. Feels good to finish a project. I have so many more that need finishing.
Here's my diagram of two blocks. The bottom one I have laid out to sew together. I now have enough little squares ready to go to make a few of these.
The following photos show my construction and then I noticed it!!!!!!!!!!!!!!!!!
YES INDEED, I did not pay attention and made a mistake. Right smack in the center. I debated for a bit but it had to be fixed. Seriously, I need to pay better attention to what I am doing.
Took the errors out and replaced and resewed and wa-la, looks much better and now I can finish.
Well, I can finish after I get this next strawberry laid out for sewing.
This one is a little smaller-7 squares by 7 squares, where the first is 8 x 8.
My layering process. backing gets taped to surface, then Quilters Dream Cotton, then Quilters Dream wool, then the top and it all gets pinned down.
I decided to use my walking foot on the Juki, worked perfectly and no marking which saves time.
All Quilted
Front and Back and time to get the binding on.
I again used my Juki and the walking foot.
I added two folded triangles to the upper corners so this little quilt can be hung up. It can be used on a table with a candle, or a mug rug or a little wall hanging.
All sewn on and now to pin and hand sew to the back.
I just put my mom's old chair in my sewing room. Now I have a spot to hand sew or read in a quiet area away from our bedroom so I don't disturb the husband. Perfect. this chair was my grandma's and then my mom's. So I do love it.Yesterday morning I was doing my hand sewing with a little furry buddy in my lap. She is actually in my lap now while I write this blog post.
All done. Feels good to finish a project. I have so many more that need finishing.
Happy Quilting and Take Care!! Martha


So lovely! Thanks for sharing the process of creating this little treasure.
ReplyDeleteThank you Pat!! This was a fun one and taught me to pay better attention to my pattern!!!
ReplyDelete