Saturday, June 29, 2013

Dear Jane's Little School-block #2

Well, I got block #2 done for my Dear Jane's Little School quilt. The Dear Jane block I used is D-7-Meeting Place. I thought it was a perfect name for a block in this quilt. The schools used to be the social center of a community, so very fitting for this little quilt!!

I also decided to do another block for My Dear Jane quilt! May as well do two at a time. I used white thread in both, so it made it quite simple.

This is the fabric I chose for the Dear Jane quilt block.
and here is a close-up of the school house fabric.
I paper pieced these blocks. Before the final trimming! The rock is from our camping trip last weekend. I brought paints for the two little ones. We painted rocks, sticks, and a couple birdhouses I brought along!!!
My Dear Jane-D-7 Meeting Place
Ditto!!
The piecing of my Dear Jane blocks are quite simple because I found a fabulous blog that gives the best instructions for Dear Jane block construction. Aunt Reen at 13 Months of Jane is fabulous!!!! Her instructions and photos are SO easy to follow!! Now, when I am preparing to do a new block, I check out her blog to see how she put hers together!!! Thank you so very much Aunt Reen, you are making this Dear Jane adventure a wonderful one for me!!! :^)

If you are interested in making your own Dear Jane quilt, be sure to check out her blog!!!

Well, that's all for today!!! I need to get outside and start hauling a few wheel-barrows full of dirt!!! Fun!!!

Until later, Take Care, Happy Quilting, and keep those scissors sharp!!! Martha

What a mess!!! OR....Creations abound

My sewing/quilting room. No need to say more!!! :)
Hopefully there will be more later!!!

Tuesday, June 18, 2013

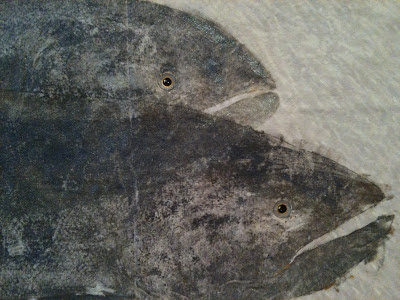
Fish eyes/Gyotaku

Gyotaku (Japanese 魚拓, from gyo "fish" + taku "rubbing") is the traditional method of Japanese fish printing, dating from the mid-1800s. This form of nature printing may have been used by fishermen to record their catches, but has also become an artform on its own.
So, this is a work in progress. I wanted to share with you what I have done so far with the fish my husband caught a couple weeks ago!!

So this is what I started with:
 One big salmon. We live just three houses and a road away from the Santiam River. You can catch Salmon and Steelhead there!!! YUM!!

 Can you believe my husband let me put paint on the fish!!!! (actually, he was gone for the evening-shhh) I washed it off well when I was done :^) Here's the fish ready for painting!

I put foam pieces down, then covered them with plastic.
Lots of sponge brushes
And my fabric paint

Pins to open the fins up with, that 's why I need the foam underneath. And the cotton swabs to wipe away the paint from the eyeball!!
I painted the entire fish and then laid the fabric on top of it and rubbed the cloth to get as much paint and texture from the fish as possible. I kind of made a mess and the painting is a bit sloppy, I have much practicing to do. This large of a fish was difficult to work with!!!
Then I painted the eyes in. I started with a silver color
I added a smaller dot of gold
Then added the black,
and a little dot of white. I also outlined the eyes lightly with a black  micron pen
And done!!
My husband was a little freaked out by the eyes because they look so real and look 3 dimensional. He said they look like glass eyes. But, of course, they are not. They are just flat and painted on!!!
Now I am drawing out a design. This will become a larger wall quilt with lots of machine quilting!! At least that is the plan. More later :)

Take care everyone, Happy Quilting and keep those scissors sharp!!! Martha

Sunday, June 16, 2013

Graduation Day!!

Me and our beautiful grand-daughter!! Alex graduated from high school yesterday!!! 
Our son Josh and his daughter!! Amazing how time flys so quickly by!!
OK, now time to get back to quilting!!! :^) Alex made her first quilt, pieced the whole thing by herself with me watching, at age 8!!! She has another she has been working on for a couple years, but time to do it is short as she is the typical teenager with many things going on, including her first job in a restaurant!!! One of these days we will get that quilt done!!! When it is finished, I will share it with you.

Take care, Happy Quilting, hug your kids, grand-kids, friends, and keep those needles sharp!!! Martha

Friday, June 7, 2013

Simple pillow cover

 I decided to give a simple free motion quilting lesson in our guilds newsletter.
 Lesson #1 consisted of using a stencil for the center, echo quilting around the stencil, then finishing with a meandering/stipple with loops. 
I also gave instructions on constructing a pillow cover out of the little quilt top.
So this is my version from the lesson. Very simple but a fun project for the beginner free motion quilter.
I used color crayons to darken the vine stencil design. Crayons are so versatile. I lightly colored until I liked what I saw, then heat set it with an iron and cover cloth to protect the iron.
I think only one member in the guild actually did the lesson. I will post one more lesson, and if there isn't any interest after that, I'll just work on my own fun projects!!! :^) No Worries!!!

I haven't been doing as much sewing and quilting lately because I decided to put the garden in this year!!! I am so happy about it and excited. In six days, the seeds are starting to pop up and the plants I put in are already showing growth!!! I am hoping to be making salsa in the fall from this garden, and eating fresh vegies through the summer!! It's so good to be back outside working!!! I love gardening. My greenhouse is even doing better now that I got it cleaned out. I am planning on a really fun and busy summer for sure!!


Happy Quilting, Take Care, and keep those scissors sharp!!! Martha