Hi Friends!!! I would like to introduce "Morning Sail", a wet felted, needled felted, quilted piece I made for my friend Lauren who has a home in Mattapoisett Massachusetts.
This was my first wet-felted project and I think it turned out pretty well. I watched several different wet-felting tutorials online before I plunged in.
I have been collecting wool roving in the hopes that I would eventually find some time to try it out.
I will show you my process for making this quilt with photos. I learn so much more by seeing than reading!!!
 |
| I started with a piece of wool fabric for my background |
 |
Then I began to pull pieces of wool roving off the long
strand and place them on the wool, creating a picture. |
 |
I really just continued in this way, trying to create a picture
that resembled the ocean and sand with the sun coming
up in the background. |
 |
| This is all freehand, not following any photo. |
 |
I would do this for awhile and then take a break. Looking
at it from all sides also helps to see where more color
is needed. |
 |
| It gets pretty fluffy as the layers pile up!! |
 |
| But as I continued I could see it come alive!!! |
 |
| This was SO FUN!!! |
 |
| Looking pretty good at this point. |
 |
These are my needle felting needles. The one on the right
didn't work too well, so I just stuck with the single needle. |
 |
I decided to needle felt the entire piece all over to begin the process of the wool
migrating into the wool fabric backing. |
 |
| You can see all my needle felting marks!!! |
 |
| These needles are sharp and hurt when poked in a finger!!! |
 |
| close up of the needle felting |
 |
I purchased bubble wrap and taped it together to create a
large backing. |
 |
| Then I laid my piece on top of the bubble wrap. |
 |
This shows all my tools for the wet felting. A swimmers
noodle, warm soapy water in the bowl and tulle. |
 |
I laid the tulle on top of the piece. Then ladled on the warm
soapy water. All over so it was very saturated. |
 |
Then I rolled it all up, tied it tightly and rolled and massaged
and even banged the entire piece on the floor.
Wet felting needs wool roving, water, soap, and friction.
I think I did this part for 30 minutes. What happens during this
process is your loose wool roving turns into felt.
So amazing!!! |
 |
| Here we are after beating it up!!! |
 |
I felt like it needed more, so leaving the tulle on, I added more
water and hand rubbed it all over for about 15 minutes. |
 |
| Then to the bathtub of clean water to soak out all the soap. |
 |
| Time to dry out!! |
 |
| This step is the process of needle-felting in the grasses and path to the ocean. |
 |
I'm using that sharp needle to do this process and like before, I am just adding
wool and creating it as I go. Kind of like painting only doing it with fuzzy stuff. |
 |
| Notice who is helping out!!?? |
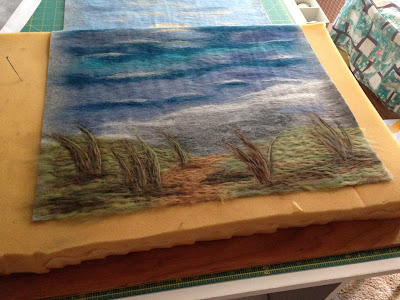 |
You can see that I am working on a large foam piece. When needle felting, you
have to have a thick piece of foam for the needle to go into. The wool will be
pushed through to the other side of the fabric and into the foam. |
 |
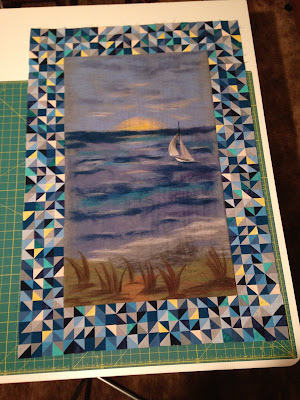
| Looking good but missing something? |
 |
I needle-felted in a sailboat. Lauren's family grew up
sailing, so a very needed subject!! |
Now begins the process of the border. I picked a hard one, that was very time consuming, but I LOVE the results of the half square triangles!!!
I found an easy way to make the triangles and will use this process in the future.
It is called the magic 8 method.
 |
I wanted the border to seem like the ocean with the light of the
sky and rising sun dancing. |
 |
| My sewing room. |
 |
| Progress!! |
Coming along nicely
 |
| Almost done |
 |
| YES!!! COMPLETED!!! |
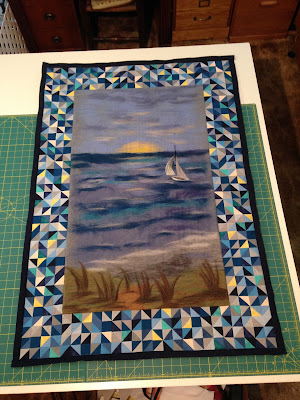 |
| Small border on and time to layer and quilt. |
 |
| Some of the sky. Quilting this was very different than a fabric quilt. |
 |
OK, I hated the ocean quilting I did on this. So the day before
this quilt was to be put in the mail, I ripped out all the ocean
quilting and re-did it. Not fun. Added a minimum of 6 hours,
but I am so happy with the results. |
 |
| Quilting the border. |
 |
| All quilted, just need to bind it. |
 |
| The back |
 |
| And close up so you can see the quilting!!! |
 |
And here it is in it's new home!!! I am so happy with the results and Lauren
loves it. Makes my heart warmed!!!! |
Well that's it from here for today, time to get ready for work!!!
Take care and Happy Quilting!!!
Love, martha


wow what a beautiful wall hanging. Interesting to read you dry needle felted it before wet felting have not comw across that before. Such detailed instructions and loving that you have addded a patchwork border of tiny tiny HSTs I love the 8 method version way to make them,beautifully quilted too, a pure delight and looks lovely on the wall
ReplyDeleteI am sure this will be so well loved and treasured.
Will save this link so I can come back ane have another look as it is so lovely
Hi Margaret! Thank you for the kind words. This was a really fun project and I really would like to do more with wet felting and pieced fabric. Not sure what the next project will be but I am thinking on it!! Have a lovely weekend!!!
DeleteReally beautiful wall hanging and such detailed instructions. Thanks so much for sharing
ReplyDeleteOk, that is just awesome! I go to Knitty Gritty for roving. But I spin and knit, haven't tried felting. But yours is terrific!
ReplyDeleteCat
That is so cool! I love how you got so much detail into it. And the border is perfect for it too. Very nice.
ReplyDeleteThank You Marti, it sure was fun to do and I really need to find some time to do more wet felting. First I need to finish the little quilt I am making from the leftovers from the border!!!
DeleteOh my gosh!! I think that's one of the most beautiful pieces I've ever seen!! What a lucky, LUCKY friend! I was so certain it was painted and shocked to see how you made it with the wool roving. I've never seen that before (but mine NEVER would've looked like that..would've been a blob! UGH). Gorgeous, gorgeous, gorgeous!!!
ReplyDelete